Skip to content

Newsletter

The Mercury Template offers a newsletter. It has an app for managing subscribers. The app is used to configure newsletters and manage mailings.

On this page, you will find a quick guide to the newsletter. It refers to the existing demo and partially addresses the options of the newsletter app.

Detailed instructions in German are available as a PDF file. You can download them here:

To demonstrate the newsletter functions, a sample newsletter with all options for this site has been set up.

The following terms are used in connection with the newsletter:

  • Newsletter
    The term “newsletter” refers to the “big picture,” i.e., the combination of an individual configuration, mailings, and subscribers.
  • Newsletter-Configuration
    The basic configuration for a newsletter, which includes the default layout and the data for the mailing address and subscribers.
  • Newsletter-Mailing
    A single email sent to subscribers of a newsletter.
  • Newsletter-OU
    An organizational unit (OU) in OpenCms in which newsletter subscribers are stored as web users.
Newsletter-App im Launchpad

You can find the Newsletter app in Launchpad.

Alternatively, you can open the app as follows:

  • Open a newsletter in the editor. At the top right of the newsletter, use the Show App button to open the app.
  • Go to Explorer, navigate to the newsletter configuration and click on “Manage mailings” in the context menu.
  • In the page editor, navigate to the newsletter sign-up page. You should now see the sign-up form for the newsletter. Above it, you will see the “Manage subscribers” button. Click on it to open the newsletter app.

Demo: “Sample newsletter in Cöln layout, German version” (de) - Here you will find the Show app button to open the newsletter app directly at the top right.

These features are available in the newsletter app.

After opening the newsletter app, click on a newsletter configuration to display the list of mailings that are to be sent or have been sent to this configuration.

Using the context menu on the mailing, you can:

  • Edit the contents of the mailing.
  • Edit the meta information of the mailing.
  • Copy the mailing.
  • Send the mailing.
  • Perform a test mailing for the mailing.

In addition, the context menu also offers other options familiar from Explorer. However, these are not usually required for the newsletter.

You can create new mailings using the toolbar option “Create mailing” (magic wand).

Alternatively, you can create a new mailing via the “Newsletter Archive” i.e., the list of newsletters that have already been sent. Use the standard functions on the elements in the list, i.e., the “plus” sign, to create a new mailing or copy an existing one.

The newsletter can also be sent directly from the Edit Content mode. Here, the finished newsletter mailing can be sent to all subscribers using the Send button. Alternatively, you can use the Test Send button to send the mailing to a selected email address on a trial basis.

In the newsletter app, you can:

  • Subscribers can be removed
  • Individual subscribers can be added
  • Lists of subscribers can be imported
    • from a “.txt” or “.csv” file containing exactly one email address per line
    • from an “.xlsx” file exported from Westernacher/IsiWeb containing newsletter subscribers
  •  

All added subscribers are activated IMMEDIATELY. Only email addresses are stored; no other subscriber data is saved.

To create and configure a new newsletter via the app, open the newsletter app on the site where you want to create the new newsletter:

  • Select the toolbar optionCreate newsletter configuration” (magic wand).
  • A dialog box will open in which you can select the “path” (directory) under which your newsletter is to be integrated into the site. Adjust any other options as necessary, confirm with “OK,” read the report that is now displayed, and click “Next.”
  • Edit and save the newsletter configuration: Enter a title and description and fill in the fields in the “Email settings” tab.

Some post-processing and testing may still be necessary:

  • If you have created pages, open the “Newsletter” page (under the path you selected for creating the newsletter configuration), test the links on the page, and customize the page according to your preferences. The page should contain:
    • A “Newsletter Archive” list that lists all mailings for the newsletter (and offers filter options on the side).
    • The newsletter configuration that has been created (once to display the headline and description, once to access subscriber management).
    • A content section with a link to sign up.
    • Possibly a superfluous empty container that should be removed.
  • Test the detail page for the newsletter configuration by displaying the newsletter configuration. If you receive an error message, the detail page is not configured. If you do not see a registration form for the newsletter on the page, edit the page so that a container is marked as a “detail container.”
  • Create a mailing for the newsletter (preferably via the app) and test whether the editing preview works (you can access this view by clicking on the mailing in the newsletter app). If not, either no detail page has been configured for newsletter mailings or the template property on this page is set incorrectly (see “Manual configuration step by step”).
  • Before you can send newsletters, you must publish the newly created resource and the pages must be fully accessible in the published version.

Note: To configure a newsletter for your site, you must be an administrator of an organizational unit, as the configuration involves creating a sub-organizational unit for subscribers.

Note: The newsletter can also be configured manually. Details can be found in the PDF instructions.

The registration page is automatically generated from the newsletter configuration. The link to this page can be created in various ways:

The permissions for managing subscribers are configured as follows by default:

  • Remove subscribers: All OpenCms users who are allowed to send newsletters to the configuration.
  • Add/import subscribers: All OpenCms users who have the role “Account Manager” in the main organizational unit.

Depending on the requirements of the respective Mercury installation, permissions can be modified as follows:

Option 1: All OpenCms users who have the role of “Account Manager” in the newsletter organizational unit (where subscribers are managed) or a higher-level organizational unit are allowed to add/import subscribers.

Option 2: All OpenCms users who are allowed to send newsletters are also allowed to add/import subscribers.

Versenden Dialog: Zeitversand

n the “Send” dialog, you can choose an alternative to direct sending by specifying when a mailing should be sent.

In the Newsletter app, mailings scheduled for later sending are marked with the label “Scheduled Sending.” Via the context menu entry “Delivery Information,” you can see the exact time the mailing is set to be sent.

If a mailing has been scheduled for later sending, this can be undone through the context menu entry “Cancel Scheduled Sending.”

Note: A mailing can no longer be sent directly once it has been scheduled for later sending.

Note: Further information can be found in the detailed manual (German only).


Newsletter: Konfiguration des automatischen Versands

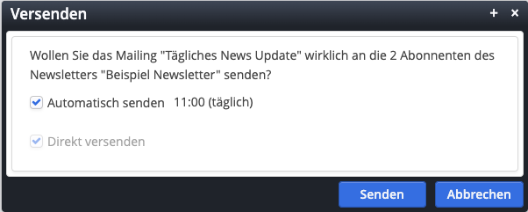
A newsletter mailing can be configured to be sent automatically. To do this, create a new newsletter mailing in the Newsletter app. In the context menu of the newly created mailing, click on “Edit.” In the form editor, activate the optional field “Automatic Sending.”

Next, you need to define the time for automatic sending. Optionally, in the “Additional Settings” field, you can restrict sending to specific weekdays. Otherwise, the mailing will be sent daily.

Then edit the contents of the mailing, for example by displaying a list of articles. Finally, publish the new mailing along with the created content.

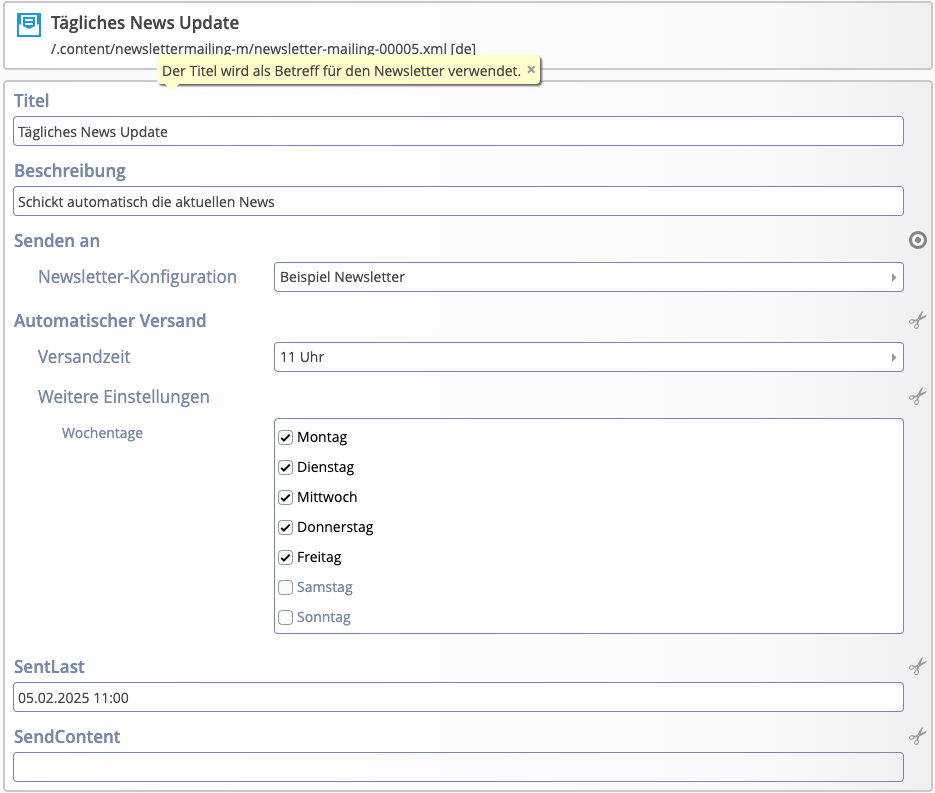
Newsletter: Dialog for activating automatic sending

Ensure that all content for your newsletter mailing has been published. Then click on “Send” in the newsletter editor or in the context menu of the mailing in the app to activate automatic sending.

Leave the “Send automatically” option activated in the dialog box that appears.

To send the newsletter mailing manually or change the times for automatic sending, automatic sending must first be paused.

If you want to pause automatic sending, click on “Pause automatic sending” in the newsletter editor or in the context menu of the mailing in the app.

To send the mailing manually, click on “Send” in the newsletter editor or in the context menu of the app, and deactivate the “Send automatically” option in the dialog box that appears.

The main component of a newsletter configured for automatic dispatch is usually a list of, for example, current news items. This list may be supplemented by “static” content, e.g., in the header and footer areas.

In contrast to manual dispatch, the list is not “fixed” when the newsletter is sent automatically; instead, the list always displays the latest news items.

Automatic sending ensures that no content for the list is sent “twice,” i.e., if there is no new content to send for the list, the newsletter is not sent.

However, this only applies as long as the configuration of the list in the newsletter is not changed. If the configuration of the list in the newsletter is changed subsequently, content that has already been sent previously may be sent once when the newsletter is sent again.

For automatically sent newsletters, no archive of the sent mailings is created; instead, the mailing created in the editor is sent again and again with the list. The content of the list is updated each time it is sent.

It may be necessary to restart OpenCms, e.g., for an update. At this point, a mailing may be in the process of being sent, further mailings may be waiting to be sent, and scheduled sending for further mailings may be activated.

If OpenCms is shut down normally, it will complete the currently running sending process. Other waiting sending actions will not be executed before shutdown.

When OpenCms is restarted, the unexecuted sending actions will be carried out. Scheduled mailings will be restored and any scheduled mailings that were planned during the downtime will be carried out immediately.

In the very rare case that OpenCms cannot be shut down normally, it is possible that a mailing will only be sent to some of the subscribers. This possibility is logged when OpenCms is restarted. Depending on the situation, the mailing will be triggered again or discarded.

Note: Further information can be found in the detailed manual (German only).

The lists are not automatically updated in the newsletter. Instead, the newsletter “remembers” which content was in the list when the newsletter was created and always displays this content.

This ensures that the same content is always displayed in the list when the newsletter page is called up again. Otherwise, newer messages could be displayed than those with which the newsletter was actually sent.

When editing the newsletter, the contents of a list are updated in the following cases:

  • When the configuration of the list itself is edited in the editor.
  • When the number of items in the list is changed via the list's item settings.

In addition, a blue “Update list” button is displayed at the top right of the list. By pressing this button, you can manually update the displayed content at any time, e.g., before finally sending the newsletter.